Tag Archives: DataFrames

Data Wrangling in Julia based on dplyr Flights Tutorials

By: Clinton Brownley

Re-posted from: https://cbrownley.wordpress.com/2017/11/29/data-wrangling-in-julia-based-on-dplyr-flights-tutorials/

A couple of my favorite tutorials for wrangling data in R with dplyr are Hadley Wickham’s dplyr package vignette and Kevin Markham’s dplyr tutorial. I enjoy the tutorials because they concisely illustrate how to use a small set of verb-based functions to carry out common data wrangling tasks.

I tend to use Python to wrangle data, but I’m exploring the Julia programming language so I thought creating a similar dplyr-based tutorial in Julia would be a fun way to examine Julia’s capabilities and syntax. Julia has several packages that make it easier to deal with tabular data, including DataFrames and DataFramesMeta.

The DataFrames package provides functions for reading and writing, split-apply-combining, reshaping, joining, sorting, querying, and grouping tabular data. The DataFramesMeta package provides a set of macros that are similar to dplyr’s verb-based functions in that they offer a more convenient, readable syntax for munging data and chaining together multiple operations.

Data

For this tutorial, let’s following along with Kevin’s tutorial and use the hflights dataset. You can obtain the dataset from R with the following commands or simply download it here: hflights.csv

install.packages("hflights")
library(hflights)
write.csv(hflights, "hflights.csv")

Load packages and example dataset

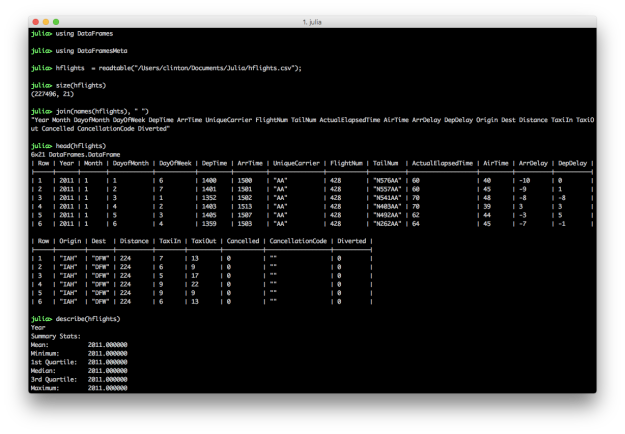
To begin, let’s start the Julia REPL, load the DataFrames and DataFramesMeta packages, and load and inspect the hflights dataset:

using DataFrames
using DataFramesMeta

hflights = readtable("/Users/clinton/Documents/Julia/hflights.csv");
size(hflights)
names(hflights)
head(hflights)
describe(hflights)
hflights1b

The semicolon on the end of the readtable command prevents it from printing the dataset to the screen. The size command returns the number of rows and columns in the dataset. You can specify you only want the number of rows with size(hflights, 1) or columns with size(hflights, 2). This dataset contains 227,496 rows and 21 columns. The names command lists the column headings. By default, the head command prints the header row and six data rows. You can specify the number of data rows to display by adding a second argument, e.g. head(hflights, 10). The describe command prints summary statistics for each column.

@where: Keep rows matching criteria

AND: All of the conditions must be true for the returned rows

# Julia DataFrames approach to view all flights on January 1
hflights[.&(hflights[:Month] .== 1, hflights[:DayofMonth] .== 1), :]

# DataFramesMeta approach
@where(hflights, :Month .== 1, :DayofMonth .== 1)
hflights2

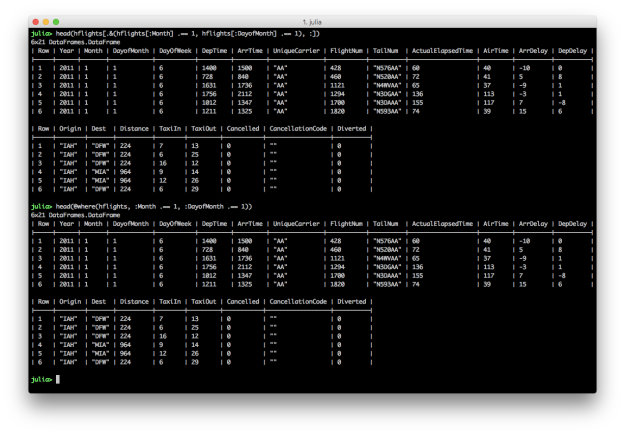
Julia’s DataFrames’ row filtering syntax is similar to R’s syntax. To specify multiple AND conditions, use “.&()” and place the filtering conditions, separated by commas, between the parentheses. Like dplyr’s filter function, DataFramesMeta’s @where macro simplifies the syntax and makes the command easier to read.

OR: One of the conditions must be true for the returned rows

# Julia DataFrames approach to view all flights where either AA or UA is the carrier
hflights[.|(hflights[:UniqueCarrier] .== "AA", hflights[:UniqueCarrier] .== "UA"), :]

# DataFramesMeta approach
@where(hflights, .|(:UniqueCarrier .== "AA", :UniqueCarrier .== "UA"))
hflights3

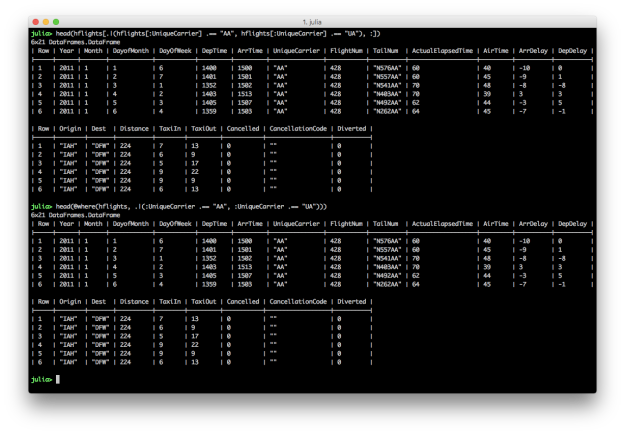
To specify multiple OR conditions, use “.|()” and place the filtering conditions between the parentheses. Again, the DataFramesMeta approach is more concise.

SET: The values in a column are in a set of interest

# Julia DataFrames approach to view all flights where the carrier is in Set(["AA", "UA"])
carriers_set = Set(["AA", "UA"])
hflights[findin(hflights[:UniqueCarrier], carriers_set), :]

# DataFramesMeta approach
@where(hflights, findin(:UniqueCarrier, carriers_set))
hflights4

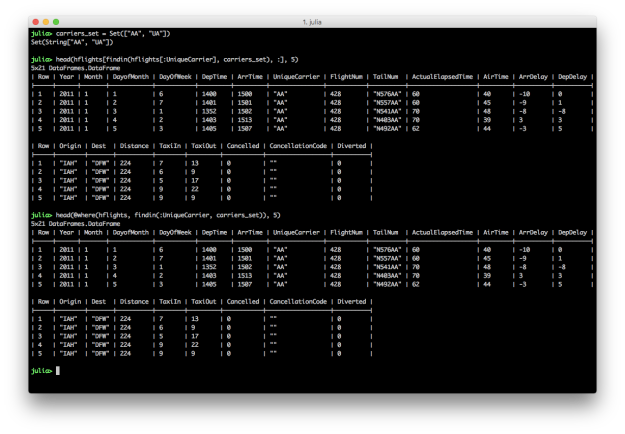
To filter for rows where the values in a particular column are in a specific set of interest, create a Set with the values you’re interested in and then specify the column and your set of interest in the findin function.

PATTERN / REGULAR EXPRESSION: The values in a column match a pattern

# Julia DataFrames approach to view all flights where the carrier matches the regular expression r"AA|UA"
carriers_pattern = r"AA|UA"
hflights[[ismatch(carriers_pattern, String(carrier)) for carrier in hflights[:UniqueCarrier]], :]

# DataFramesMeta approach
@where(hflights, [ismatch(carriers_pattern, String(carrier)) for carrier in :UniqueCarrier])
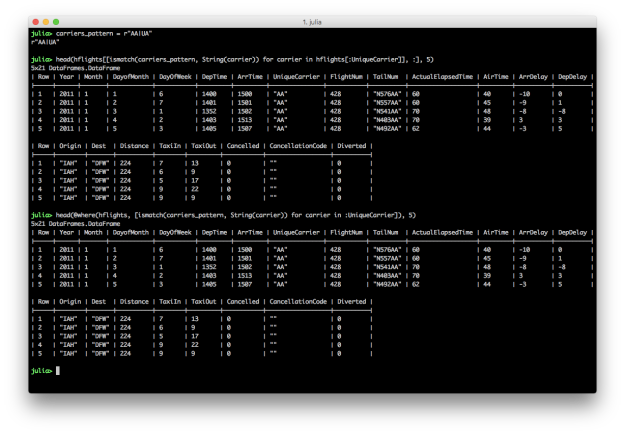
hflights5

To filter for rows where the values in a particular column match a pattern, create a regular expression and then use it in the ismatch function in an array comprehension.

@select: Pick columns by name

# Julia DataFrames approach to selecting columns
hflights[:, [:DepTime, :ArrTime, :FlightNum]]

# DataFramesMeta approach
@select(hflights, :DepTime, :ArrTime, :FlightNum)

Julia’s DataFrames’ syntax for selecting columns is similar to R’s syntax. Like dplyr’s select function, DataFramesMeta’s @select macro simplifies the syntax and makes the command easier to read.

# Julia DataFrames approach to selecting columns
# first three columns
hflights[:, 1:3]
# pattern / regular expression
heading_pattern = r"Taxi|Delay"
hflights[:, [ismatch(heading_pattern, String(name)) for name in names(hflights)]]
# startswith
hflights[:, filter(name -> startswith(String(name), "Arr"), names(hflights))]
# endswith
hflights[:, filter(name -> endswith(String(name), "Delay"), names(hflights))]
# contains
hflights[:, filter(name -> contains(String(name), "Month"), names(hflights))]

# AND conditions
hflights[:, filter(name -> startswith(String(name), "Arr") && endswith(String(name), "Delay"), names(hflights))]
# OR conditions
hflights[:, filter(name -> startswith(String(name), "Arr") || contains(String(name), "Cancel"), names(hflights))]
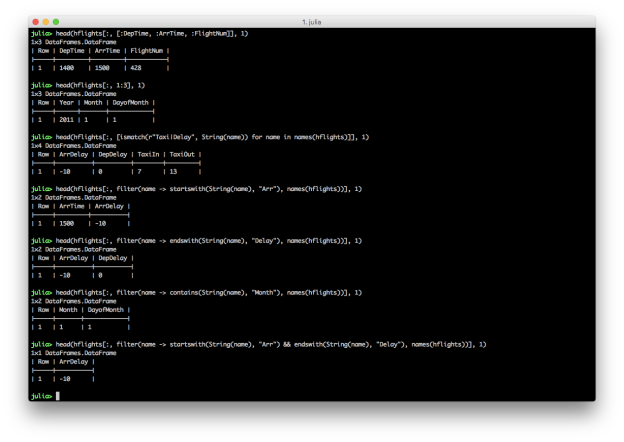
hflights6

# DataFramesMeta approach
# first three columns
@select(hflights, 1:3)
# pattern / regular expression
heading_pattern = r"Taxi|Delay"
@select(hflights, [ismatch(heading_pattern, String(name)) for name in names(hflights)])
# startswith
@select(hflights, filter(name -> startswith(String(name), "Arr"), names(hflights)))
# endswith
@select(hflights, filter(name -> endswith(String(name), "Delay"), names(hflights)))
# contains
@select(hflights, filter(name -> contains(String(name), "Month"), names(hflights)))

# AND conditions
@select(hflights, filter(name -> startswith(String(name), "Arr") && endswith(String(name), "Delay"), names(hflights)))
# OR conditions
@select(hflights, filter(name -> startswith(String(name), "Arr") || contains(String(name), "Cancel"), names(hflights)))
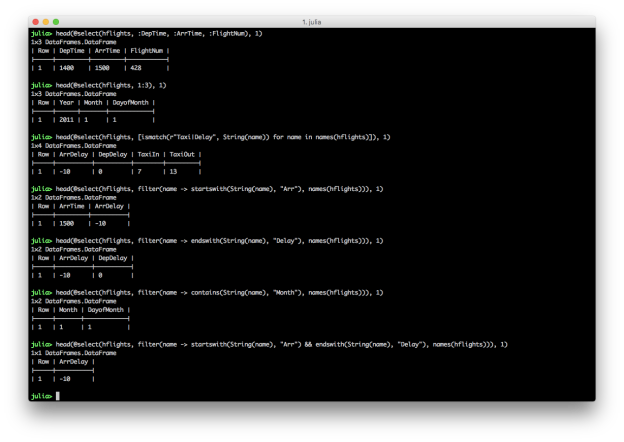
hflights7

# Kevin Markham's multiple select conditions example
# select(flights, Year:DayofMonth, contains("Taxi"), contains("Delay"))
# Julia Version of Kevin's Example
# Taxi or Delay in column heading
mask = [ismatch(r"Taxi|Delay", String(name)) for name in names(hflights)]
# Also include first three columns, i.e. Year, Month, DayofMonth
mask[1:3] = true
@select(hflights, mask)

These examples show you can select columns by position and name, and you can combine multiple conditions with AND, “&&”, or OR, “||”. Similar to filtering rows, you can select specific columns based on a pattern by using the ismatch function in an array comprehension. You can also use contains, startswith, and endswith in the filter function to select columns that contain, start with, or end with a specific text pattern.

“Chaining” or “Pipelining”

In R, dplyr provides, via the magrittr package, the %>% operator, which enables you to chain together multiple commands into a single data transformation pipeline in a very readable fashion. In Julia, the DataFramesMeta package provides the @linq macro and |> symbol to enable similar functionality. Alternatively, you can load the Lazy package and use an @> begin end block to chain together multiple commands.

# Chaining commands with DataFrameMeta’s @linq macro
@linq hflights[find(.!isna.(hflights[:,:DepDelay])), :] |>
@where(:DepDelay .> 60) |>
@select(:UniqueCarrier, :DepDelay)

# Chaining commands with Lazy’s @> begin end block
using Lazy
@> begin
hflights[find(.!isna.(hflights[:,:DepDelay])), :]
@where(:DepDelay .> 60)
@select(:UniqueCarrier, :DepDelay)
end
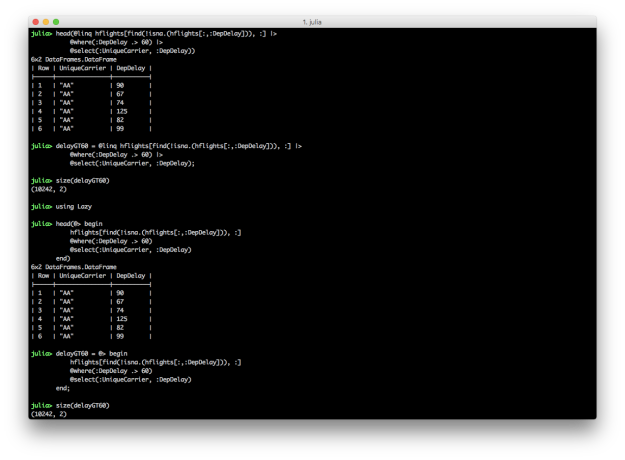
hflights8

These two blocks of code produce the same result, a DataFrame containing carrier names and departure delays for which the departure delay is greater than 60. In each chain, the first expression is the input DataFrame, e.g. hflights. In these examples, I use the find and !isna. functions to start with a DataFrame that doesn’t contain NA values in the DepDelay column because the commands fail when NAs are present. I prefer the @linq macro version over the @> begin end version because it’s so similar to the dplyr-magrittr syntax, but both versions are more succinct and readable than their non-chained versions. The screen shot shows how to assign the pipeline results to variables.

@orderby: Reorder rows

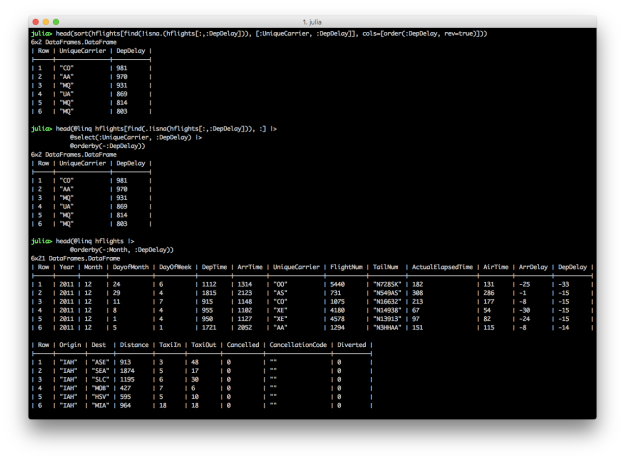
Both DataFrames and DataFramesMeta provide functions for sorting rows in a DataFrame by values in one or more columns. In the first pair of examples, we want to select the UniqueCarrier and DepDelay columns and then sort the results by the values in the DepDelay column in descending order. The last example shows how to sort by multiple columns with the @orderby macro.

# Julia DataFrames approach to sorting
sort(hflights[find(.!isna.(hflights[:,:DepDelay])), [:UniqueCarrier, :DepDelay]], cols=[order(:DepDelay, rev=true)])

# DataFramesMeta approach (add a minus sign before the column symbol for descending)
@linq hflights[find(.!isna.(hflights[:,:DepDelay])), :] |>
@select(:UniqueCarrier, :DepDelay) |>
@orderby(-:DepDelay)

# Sort hflights dataset by Month, descending, and then by DepDelay, ascending
@linq hflights |>
@orderby(-:Month, :DepDelay)
hflights9

DataFrames provides the sort and sort! functions for ordering rows in a DataFrame. sort! orders the rows, inplace. The DataFrames user guide provides additional examples of ordering rows, in ascending and descending order, based on multiple columns, as well as applying functions to columns, e.g. uppercase, before using the column for sorting.

DataFramesMeta provides the @orderby macro for ordering rows in a DataFrame. Specify multiple column names in the @orderby macro to sort the rows by multiple columns. Use a minus sign before a column name to sort in descending order.

@transform: Add new variables

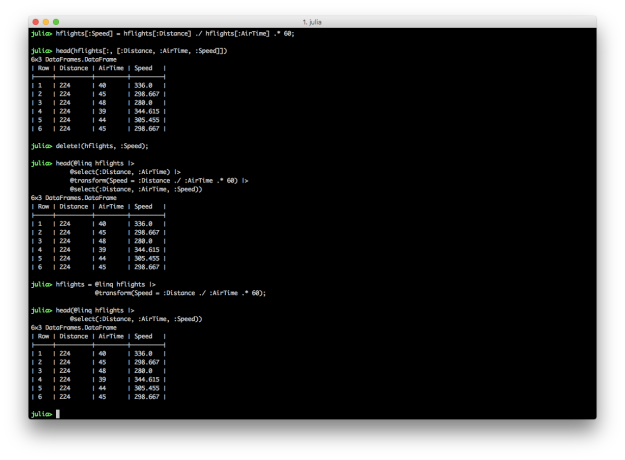
Creating new variables in Julia DataFrames is similar to creating new variables in Python and R. You specify a new column name in square brackets after the name of the DataFrame and assign it a collection of values, sometimes based on values in other columns. DataFramesMeta’s @transform macro simplifies the syntax and makes the transformation more readable.

# Julia DataFrames approach to creating new variable
hflights[:Speed] = hflights[:Distance] ./ hflights[:AirTime] .* 60
hflights[:, [:Distance, :AirTime, :Speed]]

# Delete the variable so we can recreate it with DataFramesMeta approach
delete!(hflights, :Speed)

# DataFramesMeta approach
@linq hflights |>
@select(:Distance, :AirTime) |>
@transform(Speed = :Distance ./ :AirTime .* 60) |>
@select(:Distance, :AirTime, :Speed)

# Save the new column in the original DataFrame
hflights = @linq hflights |>
@transform(Speed = :Distance ./ :AirTime .* 60)
hflights10

The first code block illustrates how to create a new column in a DataFrame and assign it values based on values in other columns. The second code block shows you can use delete! to delete a column. The third example demonstrates the DataFramesMeta approach to creating a new column using the @transform macro. The last example shows how to save a new column in an existing DataFrame using the @transform macro by assigning the result of the transformation to the existing DataFrame.

@by: Reduce variables to values (Grouping and Summarizing)

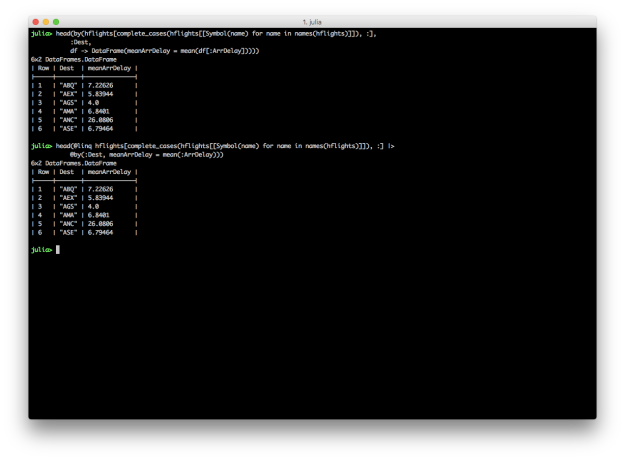
dplyr provides group_by and summarise functions for grouping and summarising data. DataFrames and DataFramesMeta also support the split-apply-combine strategy with the by function and the @by macro, respectively. Here Julia versions of Kevin’s summarise examples.

# Julia DataFrames approach to grouping and summarizing
by(hflights[complete_cases(hflights[[Symbol(name) for name in names(hflights)]]), :],
:Dest,
df -> DataFrame(meanArrDelay = mean(df[:ArrDelay])))

# DataFramesMeta approach
@linq hflights[complete_cases(hflights[[Symbol(name) for name in names(hflights)]]), :] |>
@by(:Dest, meanArrDelay = mean(:ArrDelay))
hflights11

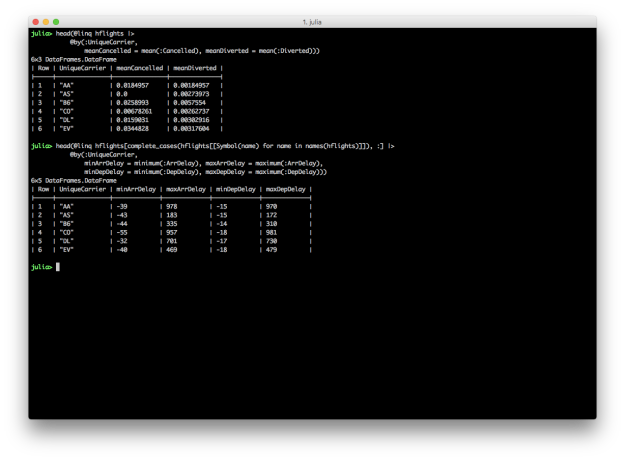
DataFrames and DataFramesMeta don’t have dplyr’s summarise_each function, but it’s easy to apply different functions to multiple columns inside the @by macro.

@linq hflights |>
@by(:UniqueCarrier,
meanCancelled = mean(:Cancelled), meanDiverted = mean(:Diverted))

@linq hflights[complete_cases(hflights[[Symbol(name) for name in names(hflights)]]), :] |>
@by(:UniqueCarrier,
minArrDelay = minimum(:ArrDelay), maxArrDelay = maximum(:ArrDelay),
minDepDelay = minimum(:DepDelay), maxDepDelay = maximum(:DepDelay))
hflights12

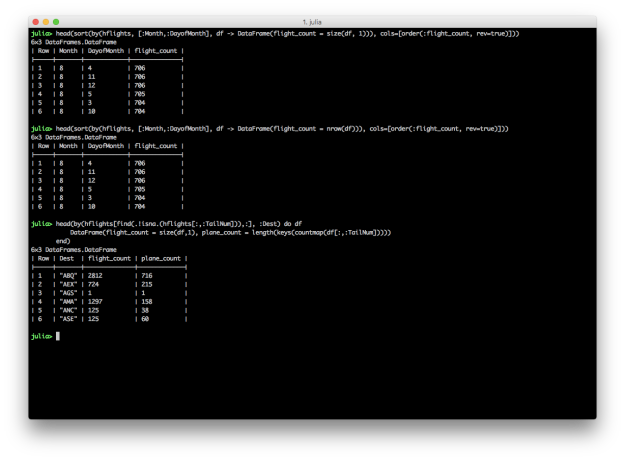
DataFrames and DataFramesMeta also don’t have dplyr’s n and n_distinct functions, but you can count the number of rows in a group with size(df, 1) or nrow(df), and you can count the number of distinct values in a group with countmap.

# Group by Month and DayofMonth, count the number of flights, and sort descending
# Count the number of rows with size(df, 1)
sort(by(hflights, [:Month,:DayofMonth], df -> DataFrame(flight_count = size(df, 1))), cols=[order(:flight_count, rev=true)])

# Group by Month and DayofMonth, count the number of flights, and sort descending
# Count the number of rows with nrow(df)
sort(by(hflights, [:Month,:DayofMonth], df -> DataFrame(flight_count = nrow(df))), cols=[order(:flight_count, rev=true)])

# Split grouping and sorting into two separate operations
g = by(hflights, [:Month,:DayofMonth], df -> DataFrame(flight_count = nrow(df)))
sort(g, cols=[order(:flight_count, rev=true)])

# For each destination, count the total number of flights and the number of distinct planes
by(hflights[find(.!isna.(hflights[:,:TailNum])),:], :Dest) do df
DataFrame(flight_count = size(df,1), plane_count = length(keys(countmap(df[:,:TailNum]))))
end
hflights13

While these examples reproduce the results in Kevin’s dplyr tutorial, they’re definitely not as succinct and readable as the dplyr versions. Grouping by multiple columns, summarizing with counts and distinct counts, and gracefully chaining these operations are areas where DataFrames and DataFramesMeta can improve.

Other useful convenience functions

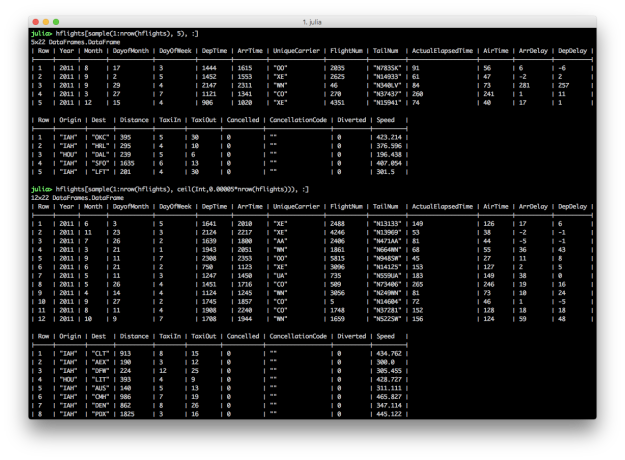
Randomly sampling a fixed number or fraction of rows from a DataFrame can be a helpful operation. dplyr offers the sample_n and sample_frac functions to perform these operations. In Julia, StatsBase provides the sample function, which you can repurpose to achieve similar results.


using StatsBase
# randomly sample a fixed number of rows
hflights[sample(1:nrow(hflights), 5), :]
hflights[sample(1:size(hflights,1), 5), :]

# randomly sample a fraction of rows
hflights[sample(1:nrow(hflights), ceil(Int,0.0001*nrow(hflights))), :]
hflights[sample(1:size(hflights,1), ceil(Int,0.0001*size(hflights,1))), :]
hflights14

Randomly sampling a fixed number of rows is fairly straightforward. You use the sample function to randomly select a fixed number of rows, in this case five, from the DataFrame. Randomly sampling a fraction of rows is slightly more complicated because, since the sample function takes an integer for the number of rows to return, you need to use the ceil function to convert the fraction of rows, in this case 0.0001*nrow(hflights), into an integer.

Conclusion

In R, dplyr sets a high bar for wrangling data well with succinct, readable code. In Julia, DataFrames and DataFramesMeta provide many useful functions and macros that produce similar results; however, some of the syntax isn’t as concise and clear as it is with dplyr, e.g. selecting columns in different ways and chaining together grouping and summarizing operations. These are areas where Julia’s packages can improve.

I enjoyed becoming more familiar with Julia by reproducing much of Kevin’s dplyr tutorial. It was also informative to see differences in functionality and readability between dplyr and Julia’s packages. I hope you enjoyed this tutorial and find it to be a useful reference for wrangling data in Julia.

Filed under: Analytics, General, Julia, Python, R, Statistics Tagged: DataFrames, DataFramesMeta, dplyr, Julia, Python, R

Intro to Julia: Filtering Rows with R, Python, and Julia

By: Clinton Brownley

Re-posted from: https://cbrownley.wordpress.com/2015/07/26/intro-to-julia-filtering-rows-with-r-python-and-julia/

In one of my earlier posts I introduced the Julia programming language by comparing how you can read and write CSV files in R, Python, and Julia. In this post I’d like to build on that comparison by describing how you can filter for specific rows in a data set in each language based on a filtering condition, set of interest, and pattern (i.e. regular expression). We’ll be using the same wine quality data set we used in the earlier post, which is available here: wine quality

We’ll use the same three row filters in all of the examples so it’s easy to confirm that the output is consistent across all three languages:

  1. The first row filter specifies a condition that restricts the output to rows where the value in the quality column is greater than 7.
  2. The second row filter specifies a set of interest that restricts the output to rows where the value in the quality column is either 7 or 8.
  3. The third row filter specifies a pattern that restricts the output to rows where the value in the quality column contains an 8.

R

To begin, let’s see how you can filter for specific rows in R. First we’ll cover how to filter for rows with base R, and then we’ll describe how to accomplish the same task with the data.table and dplyr packages, which are popular packages for managing data in R.

Base R

The following script illustrates how to read data into a data frame, filter for specific rows based on a filter condition, set of interest, and pattern, and write the output of interest to an output file. All three filtering sections show two different ways to filter the rows, first using row indexing and then using the subset function.

Copy and paste the following code into a text file and then save the file as filter_rows.R

#!/usr/bin/env Rscript
# For more information, visit: https://cbrownley.wordpress.com/

#Collect the command line arguments into a variable called args
args <- commandArgs(trailingOnly = TRUE)
# Assign the first command line argument to a variable called input_file
input_file <- args[1]
# Assign the second command line argument to a variable called output_file
output_file <- args[2]

# Use R’s read.csv function to read the data into a variable called wine
# read.csv expects a CSV file with a header row, so
# sep = ',' and header = TRUE are default values
# stringsAsFactors = FALSE means don’t convert character vectors into factors
wine <- read.csv(input_file, sep = ',', header = TRUE, stringsAsFactors = FALSE)

# Row Value Meets Specific Condition
wine_condition <- wine[which(wine$quality > 7), ]
# Using subset function
wine_condition <- subset(wine, quality > 7)
#print(wine_condition)

# Row Value In Set of Interest
set_of_interest <- c(7, 8)
wine_set <- wine[which(wine$quality %in% set_of_interest), ]
# Using subset function
wine_set <- subset(wine, quality %in% set_of_interest)
#print(wine_set)

# Row Value Matches Specific Pattern
pattern <- '^8$'
wine_pattern <- wine[grep(pattern, wine$quality, ignore.case=TRUE, perl=TRUE), ]
# Using subset function
#wine_pattern <- subset(wine, quality==pattern)
print(wine_pattern)

# Use R’s write.csv function to write the data in the variable wine to the output file
write.csv(wine_pattern, file = output_file, row.names = FALSE)

The section that filters for rows based on a condition only includes one condition, i.e. wine$quality > 7, but you can add more conditions with ANDs, &, and ORs, |. For example, to filter for rows where quality > 7 AND alcohol > 13.0 you can use:
wine_condition <- wine[which(wine$quality > 7 & wine$alcohol > 13.0), ]

Similarly, to filter for rows where quality < 4 OR alcohol > 13.0 you can use:
wine_condition <- wine[which(wine$quality < 4 | wine$alcohol > 13.0), ]

If instead you want to exclude a selection of rows you can negate the which function with a dash, -, like this:
wine_condition <- wine[-which(wine$quality > 7), ]

The section that filters for rows based on a set of interest uses the which function and the %in% binary operator to select rows where the value in the quality column is one of the two values in the set of interest. It’s convenient to assign the values of interest to a variable and then use the variable in the filtering condition so that if the values of interest change you only have to make one change where the values are assigned to the variable.

The section that filters for rows based on a pattern uses the Unix-inspired grep command to select rows where the pattern appears somewhere in the value in the quality column. The ^ metacharacter indicates that the 8 appears at the beginning of the value and the $ metacharacter indicates that the 8 appears at the end of the value, so enclosing the 8 between both ensures that grep looks for rows where 8 is the only value in the quality column. The ignore.case argument isn’t necessary in this case since we’re looking for number, but I included it to show you that it’s available and where to put it if you need it. Similarly, the ^ and $ metacharacters and perl argument aren’t necessary either since we’re searching for a simple number, but I included them to demonstrate how you can use a regular expression and the perl argument to search for a specific pattern.

Now run the following two commands in a Terminal window to make the script executable and to run the script:

chmod +x filter_rows.R
./filter_rows.R winequality-red.csv output/output_R.csv

When you run these commands you’ll see the following output printed to your Terminal screen. In addition, the set of rows matching the pattern in the final filtering section have been written to a CSV file in the output folder inside your current folder.

Base R

R package: data.table

Now that we know how to filter for specific rows in base R, let’s discuss how to filter for rows with the data.table package. The following script illustrates how to do so. Copy and paste the following code into a text file and then save the file as filter_rows_data_table.R

#!/usr/bin/env Rscript
require(data.table)

args <- commandArgs(trailingOnly = TRUE)
input_file <- args[1]
output_file <- args[2]

wine <- fread(input_file)

# Row Value Meets Specific Condition
wine_condition <- wine[quality > 7]

# Row Value In Set of Interest
set_of_interest <- c(7, 8)
wine_set <- wine[quality %in% set_of_interest]

# Row Value Matches Specific Pattern
pattern <- '8'
wine_pattern <- wine[quality==pattern]
print(wine_pattern)

write.csv(wine_pattern, file = output_file, row.names = FALSE)

The filtering syntax is very similar to the syntax we used in the base R versions, so you can look in the base R section above for some explanations about the syntax. Now make the script executable and then run the script:

chmod +x filter_rows_data_table.R
./filter_rows_data_table.R winequality-red.csv output/output_R_data_table.csv

When you run these commands you’ll see the same output as you saw with base R printed to your Terminal screen and you’ll have written another CSV file in the output folder.

R package: dplyr

Now let’s see how to filter for rows with the dplyr package. Copy and paste the following code into a text file and then save the file as filter_rows_dplyr.R

#!/usr/bin/env Rscript
require(data.table)
require(dplyr)

args <- commandArgs(trailingOnly = TRUE)
input_file <- args[1]
output_file <- args[2]

wine <- fread(input_file)
wine <- tbl_df(wine)

# Row Value Meets Specific Condition
wine_condition <- wine %>% filter(quality > 7)

# Row Value In Set of Interest
set_of_interest <- c(7, 8)
wine_set <- wine %>% filter(quality %in% set_of_interest)

# Row Value Matches Specific Pattern
pattern <- '8'
wine_pattern <- wine %>% filter(quality==pattern)
print(wine_pattern)

write.csv(wine_pattern, file = output_file, row.names = FALSE)

All three filtering sections use the %>% operator, pulled into dplyr from the magrittr package, and dplyr’s own filter function. The %>% operator is pronounced, “then”, as in “do this, then, do that”. It takes the result of the operation on the left-hand-side of the operator and passes it as the first argument to the operation on the right-hand-side of the operator.

In all three filtering sections we’re simply using it to pass the data set into the filter function. Chaining these two operations doesn’t gain us much – it’s simply to demonstrate how you can use the %>% operator to chain operations together to make your code easier to read and understand. As you’d guess, the filter function filters for rows in the data set with a value that meets the filtering criterion or criteria. Now make the script executable and then run the script:

chmod +x filter_rows_dplyr.R
./filter_rows_dplyr.R winequality-red.csv output/output_R_dplyr.csv

As before, when you run these commands you’ll see the same output as you saw with base R and the data.table package printed to your Terminal screen and you will have written another CSV file in the output folder.

PYTHON

Now that we know how to filter for specific rows in R, let’s discuss how to filter for rows in Python. First we’ll cover how to filter for rows with base Python, and then we’ll describe how to accomplish the same tasks with Pandas, which is a popular package for managing data in Python.

Base Python

The following script illustrates how to process a CSV file line by line, filter for specific rows based on a filter condition, set of interest, and pattern, and write the results to an output file.

Copy and paste the following code into a text file and then save the file as filter_rows.py

#!/usr/bin/env python
# For more information, visit: https://cbrownley.wordpress.com/
# Import Python's built-in csv and sys modules, which have functions
# for processing CSV files and command line arguments, respectively
import csv
import re
import sys

# Assign the first command line argument to a variable called input_file
input_file = sys.argv[1]
# Assign the second command line argument to a variable called output_file
output_file = sys.argv[2]

header_row = True

# Open the input file for reading and close automatically at end
with open(input_file, 'rU') as csv_in_file:
    # Open the output file for writing and close automatically at end
    with open(output_file, 'wb') as csv_out_file:
        # Create a file reader object for reading all of the input data
        filereader = csv.reader(csv_in_file)
        # Create a file writer object for writing to the output file
        filewriter = csv.writer(csv_out_file)
        # Use a for loop to process the rows in the input file one-by-one
        for row in filereader:
            # Process the header row separately from the data rows
            # Print it to the screen, write it to the output file, and then
            # indicate that you're finished with the header row
            if header_row == True:
                print row
                filewriter.writerow(row)
                header_row = False
            # Process the data rows according to three filtering conditions
            else:
                # Row Value Meets Specific Condition
                #if int(row[11]) > 7:
                    #print row
                    #filewriter.writerow(row)

                # Row Value In Set of Interest
                #set_of_interest = [7, 8]
                #if int(row[11]) in set_of_interest:
                    #print row
                    #filewriter.writerow(row)

                # Row Value Matches Specific Pattern
                pattern = re.compile(r'(?P<my_pattern>8)', re.I)
                result = pattern.search(row[11])
                if result == None:
                    pass
                else:
                    print row
                    filewriter.writerow(row)

We process the header row separately from the data rows because we don’t want to test the header row against the filtering conditions. The built-in csv module reads each row from the input file as a list, a.k.a. array, so we use list indexing, row[11], to access the values in the quality column, which is the twelfth column in the data set (in Python, the first array index is 0). The first two filtering sections are fairly straightforward, i.e. in the first section, the integer version of the value in the quality column is > 7 and in the second section it is one of the values in the set of interest. These two sections are currently commented out with # symbols, but you can uncomment the sections one-at-a-time to see how the output changes.

The third section uses the re module to create a regular expression, search for the pattern in the quality column, and print and write the row when the value in the quality column matches the pattern. The re.I argument makes the pattern case-insensitive. As we said in the R section, we don’t need the argument in this case but it’s helpful to know where to include it if you need it. Now make the script executable and then run the script:

chmod +x filter_rows.py
./filter_rows.py winequality-red.csv output/output_Python.csv

When you run these commands you’ll see the following output printed to your Terminal screen. In addition, the header row and the set of rows matching the pattern in the final filtering section have been written to a CSV file in the output folder.

Base Python

Python package: Pandas

Now let’s see how to filter for rows with Pandas. Copy and paste the following code into a text file and then save the file as filter_rows_pandas.py

#!/usr/bin/env python
import sys
import string
import pandas as pd

input_file = sys.argv[1]
output_file = sys.argv[2]

data_frame = pd.read_csv(input_file)

# Row Value Meets Specific Condition
data_frame_value_meets_condition = data_frame[data_frame['quality'].astype(int) > 7]

# Row Value In Set of Interest
set_of_interest = [7, 8]
data_frame_value_in_set = data_frame[data_frame['quality'].isin(set_of_interest)]

# Row Value Matches Specific Pattern
data_frame_value_matches_pattern = data_frame[data_frame['quality'].astype(str).str.contains("8")]
print(data_frame_value_matches_pattern)

data_frame_value_matches_pattern.to_csv(output_file, index=False)

In the first filtering section we select the quality column, convert the values into integers, and then test whether they’re greater than 7. In the second section we use the isin function to test whether the value in the quality column is one of the values in the set of interest. Finally, in the third section, we use the contains function to test whether the value in the quality column contains 8. There are also startswith and endswith functions in case you need to test whether the value starts with or ends with a specific pattern.

Pandas also has a convenient .ix function that you can use to filter for specific rows and columns at the same time. Here’s how you could modify the first filtering section to use the .ix function: data_frame_value_meets_condition = data_frame.ix[data_frame.quality.astype(int) > 7, :]

You can select the column by typing data_frame.column. Like R, you need to separate the rows and columns sections with a comma, and you use a colon to indicate that you want to select all of the rows or columns (In this case we want to select all of the columns). Now run the following two commands to make the script executable and to run the script:

chmod +x filter_rows_pandas.py
./filter_rows_pandas.py winequality-red.csv output/output_Python_Pandas.csv

When you run these commands you’ll see similar output as you saw with base Python printed to your Terminal screen, although it will be formatted differently. In addition, the header row and the set of rows matching the pattern in the final filtering section have been written to a CSV file in the output folder.

JULIA

Now that we know how to filter for specific rows in Python, let’s discuss how to filter for rows in Julia. First we’ll cover how to filter for rows with base Julia, and then we’ll describe how to accomplish the same tasks with DataFrames, which is a popular package for managing data in Julia.

Base Julia

The following script illustrates how to read a CSV file line by line, filter for specific rows based on a filter condition, set of interest, and pattern, and write the output of interest to an output file.

Copy and paste this code into a text file and then save the file as filter_rows.jl

#!/usr/bin/env julia
# For more information, visit: https://cbrownley.wordpress.com/

# Assign the first command line argument to a variable called input_file
input_file = ARGS[1]
# Assign the second command line argument to a variable called output_file
output_file = ARGS[2]

# Open the output file for writing
out_file = open(output_file, "w")

header_row = true
# Open the input file for reading and close automatically at end
open(input_file, "r") do in_file
    # Use a for loop to process the rows in the input file one-by-one
    for row in eachline(in_file)
        if header_row == true
            print(row)
            write(out_file, row)
            global header_row = false
        else
            row_array = map(float, split(strip(row), ","))
            #println(row_array)

            # Row Value Meets Specific Condition
            if row_array[12] > 7.0
                #print(join(row_array, ",") * "\n")
                #write(out_file, join(row_array, ",") * "\n")
            end

            # Row Value In Set of Interest
            set_of_interest = Set(7.0, 8.0)
            if in(row_array[12], set_of_interest)
                #print(join(row_array, ",") * "\n")
                #write(out_file, join(row_array, ",") * "\n")
            end

            # Row Value Matches Specific Pattern
            pattern = r"8$"
            if ismatch(pattern, row)
                print(row)
                write(out_file, row)
            end

        # Close the if-else statement
        end
    # Close the for loop
    end
# Close the input file handle
end
# Close the output file handle
#close(out_file)

Let’s explain some of the syntax in this script that’s different from R and Python. For example, the open(…) do statement creates an anonymous function with its own scope, so when we initially define the variable header_row above the open(…) do statement and then assign a new value to the variable inside the open(…) do statement we have to precede the variable name with the keyword global.

It’s helpful to keep in mind that for, while, try, and let blocks also default to local scopes, but they do inherit from a parent scope like the one created by the open(…) do statement. Therefore, if we initially define the variable header_row right beneath the open(…) do statement, then the for loop will inherit the variable from the parent scope and we won’t need to precede the variable name with the keyword global. That is, the following alternative syntax would work too:

open(input_file, "r") do in_file
    header_row = true
    # Use a for loop to process the rows in the input file one-by-one
    for row in eachline(in_file)
        if header_row == true
            print(row)
            write(out_file, row)
            header_row = false

Like base Python without the csv module, Julia reads each row from the file in as a string, so we use the strip function to remove the trailing newline character, then the split function to split the string on commas and convert it into an array, and finally we map the float function to each of the elements in the array to convert all of the values to floating-point numbers.

The println function adds a newline character on the end of the line before printing the line to the screen whereas the print function does not, it prints the line as-is.

The first two row filtering sections use the join function and the string concatenation symbol, *, to create the row of output that will be printed to the screen and written to the output file. In this case, the join function places commas between each of the elements in the array and converts it to a string. Then we add a newline character to the end of the string with the * concatenation symbol.

We test whether the value in the quality column (in Julia, the first array index is 1), is in the set of interest with the in function. Similarly, we test whether the pattern appears in the row using the ismatch function. You’ll notice that we leave the row as a string, i.e. we don’t convert it into an array, to use the ismatch function since ismatch looks for the pattern in a string, not an array.

Now run the following two commands to make the script executable and to run the script:

chmod +x filter_rows.jl
./filter_rows.jl winequality-red.csv output/output_Julia.csv

When you run these commands you’ll see the following printed to your Terminal screen. In addition, the header row and the set of rows matching the pattern in the final filtering section have been written to a CSV file in the output folder.

Base Julia

Julia packages: DataFrames and DataFramesMeta

Now that we know how to filter for specific rows in base Julia, let’s discuss how to filter for rows with DataFrames, a popular package for managing tabular data in Julia. The following script illustrates how to do so. Copy and paste this code into a text file and then save the file as filter_rows_data_frames.jl

#!/usr/bin/env julia
using DataFrames
using DataFramesMeta

input_file = ARGS[1]
output_file = ARGS[2]

data_frame = readtable(input_file, separator = ',')

# Row Value Meets Specific Condition
data_frame_value_meets_condition = data_frame[data_frame[:quality] .> 7, :]
#data_frame_value_meets_condition = data_frame[(data_frame[:quality] .== 7) | (data_frame[:quality] .== 8), :]
#println(data_frame_value_meets_condition)

# Row Value In Set of Interest
set_of_interest = Set(7, 8)
data_frame_value_in_set = data_frame[findin(data_frame[:quality], set_of_interest), :]
#println(data_frame_value_in_set)

# Row Value Matches Specific Pattern
pattern = r"8"
data_frame_value_matches_pattern = data_frame[[ismatch(pattern, string(value)) for value in data_frame[:quality]], :]
#data_frame_value_matches_pattern = @where(data_frame, [ismatch(pattern, string(value)) for value in :quality])
println(data_frame_value_matches_pattern)

writetable(output_file, data_frame_value_matches_pattern)

The first filtering section demonstrates how you can use one condition or multiple conditions to filter for specific rows. In Julia, you precede the comparison operator with a period, for example .==, to do element-wise comparisons. To use multiple conditions you wrap each one in parentheses and combine them with ANDs, &, or ORs, |. The colon has the same meaning that it does in R and Python. In this case, we’re using it to retain all of the columns.

We use the findin function to determine which rows have the value 7 or 8 in the quality column in order to retain these rows.

The third filtering section demonstrates two slightly different ways to filter for rows based on a pattern. Both methods use row indexing, the ismatch function, and array comprehensions to look for the pattern in each of the elements in the quality column/array. The only real difference between the two methods is that in the first method we have to specify data_frame[…] twice, whereas the second method uses the @where meta-command from the DataFramesMeta package to enable us to refer to the data_frame once and then refer to the quality column with :quality instead of the slightly more cumbersome data_frame[quality].

Now run the following two commands to make the script executable and to run the script:

chmod +x filter_rows_data_frames.jl
./filter_rows_data_frames.jl winequality-red.csv output/output_Julia_DataFrames.csv

When you run these commands you’ll see similar output as you saw with base Julia printed to your Terminal screen, although it will be formatted differently. In addition, the header row and the set of rows matching the pattern in the final filtering section have been written to a CSV file in the output folder.

As you can see, when it comes to filtering for specific rows, the differences in syntax between Python and Julia are very slight. For example, Python’s “if value in set_of_interest” statements are “in(value, set_of_interest)” statements in Julia, and Python’s pattern matching “pattern.search()” statements are “ismatch()” statements in Julia. On the other hand, one difference to keep in mind is that for loops in Julia default to local scope so if you’ve defined a variable outside of a for loop and you need to use it inside the for loop, then you need to precede the variable name with the word global.

Now that we know how to read and write data in a CSV-formatted input file and filter for specific rows with R, Python, and Julia, the next step is to figure out how to filter for specific columns in these languages. Then we can move on to processing lots of files in a directory and also dealing with Excel files. We’ll cover these topics in future posts.

I’d like to thank the Julia users group, especially Nils Gudat and David Gold, for helping me figure out how to use the findin and ismatch functions to filter for specific rows while using the DataFrames package.

All Scripts and Output Files

Filed under: Analytics, General, Julia, Management, Python, R Tagged: CSV, data.table, DataFrames, DataFramesMeta, dplyr, Filter Rows, Julia, Pandas, Python, R, Wine Quality